
Phase 1 - Access - Sophos VPN Setup and Installation
Install and Configure Sophos VPN client
Go to SophosConnect-MSI-File and download the Sophos VPN application for Windows.
Run the .msi setup file.

Accept the End User License Agreement and Select Install.

Select Finish and Launch the Sophos Connect client.

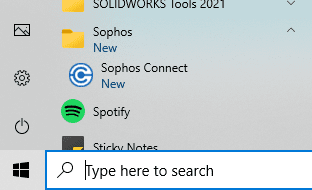
Note: Navigate to the Sophos Connect client in the windows start menu or select the Sophos VPN icon located by the clock in Windows 10.
Step 5. Select the blue button labeled Import Connection.

Step 6: Browse to the .PRO file that contains OTP in the file name. This connection file will require a One Time Password to connect.
(The file name in the screenshot may not be exactly the same for each company)

It is recommended to reboot your computer at this stage.
Next, setup the Multifactor Authentication rolling code on your mobile device.
To begin, navigate to the Sophos login web portal that is provided by Converge Design.
If the link cannot be located, contact support@converge.design

Login using your Sophos VPN client credentials.
You will be automatically redirected to a page with a QR code.

Download and open the Authenticator app of your choice on your mobile device and select the + sign to add.
Note: The following Authenticator Apps are supported.
- Google Authenticator
- Microsoft Authenticator
- Duo Mobile
- Okta Verify
Scan the QR code. You will now have a code in your Authenticator app to use with the Sophos VPN client.

When connecting, enter your Sophos VPN Username, then your Sophos VPN Password. Then fill in the captcha characters at the bottom of the client login screen. You may select to save username and password.
Enter the One-Time-Password code from your Authenticator app on your device. It is recommended to enter this code last since it is on a timer.

You may have to enter your username and password a few times during the initial login process.
After completing the login process the first time, the rolling code token timing will sync up with the firewall. You should then be presented with the login window again. The captcha will be missing in the second login window.
Enter your login information again and select "Sign In".

The OTP Login setup is now complete.
Note:
If you need to login to the web portal again after setting up your rolling code. Enter the rolling code at the end of your password in this format.
password+code

Phase 2 - Access - RDP into Server
Install and Configure Sophos VPN client
1. Use Windows RDP as well as the credentials provided at the time of delivery.
Accessing the server in this manner is only needed for Administrative tasks and Application installation or update.
If you are unfamiliar with the process please contact your local Administrator or your EpiGrid ReSeller for assistance.
Phase 3 - Server - Install SOLIDWORKS PDM (Standard or Professional)
EpiGrid Servers, starting on December 1st, 2021, are setup to use Fully Qualified Domain Names (FQDN) This is done to simplify deployment to end user workstations as well as user experience improvements
You will need to follow the instruction specified in SOLIDWORKS Knowledge Base Article S-038755
Due to the technical nature of some of the steps involved, please contact your SOLIDWORKS Reseller for a copy of these instructions and their assistance with installation.
NOTE: SQL is no longer included with the purchase of SOLIDWORKS PDM Professional. All new installations as well as upgrades to PDM 2022 or later must aquire an appropriate SQL License, Software Assurance, and Mobility Certificate. Alternatively, you may elect to use the EpiGrid SQL SPLA Lic for a fee, Please contact your EpiGrid ReSeller for more information and also refer to "SQL License Compliance Policy" at www.epigrid.com/legal for more details.
Phase 4 - Server - Create PDM Local View
The process to create the Local View on the Server is the same as on a WorkStation
Please refer to Phase 6 below
On the Server ensure the Local View is setup on the C:\ drive, same as program files and the operating system.
Phase 5 - WorkStation - Sophos VPN Setup and Installation
First, ensure you have requested and received unique usernames and passwords for each user.
Next, on each WorkStation that will access the server, install Sophos VPN as detailed in Phase 1 above.
Phase 6 - WorkStation - Install SOLIDWORKS PDM (Standard or Professional)
PDM Client Installation
Each user that will be connecting to any PDM vault must have the PDM client installed first. If you already have SOLIDWORKS CAD installed and will be adding the PDM client to your existing installation, follow the steps below. If you are installing the PDM Client Only (without SW CAD), contact your SW Reseller for installation instructions.
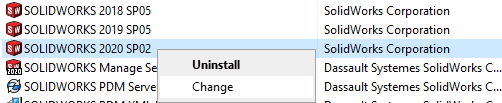
1. Launch the Windows Control Panel and navigate to Uninstall a Program or Programs and Features.

2. Scroll and locate the SOLIDWORKS program. Make sure you are modifying the correct version installation. Right click the application and select Change.
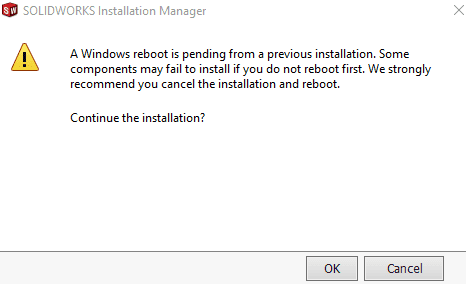
Dismiss the warning below if prompted by selecting OK.
3. Select Modify your installation and then select Next.

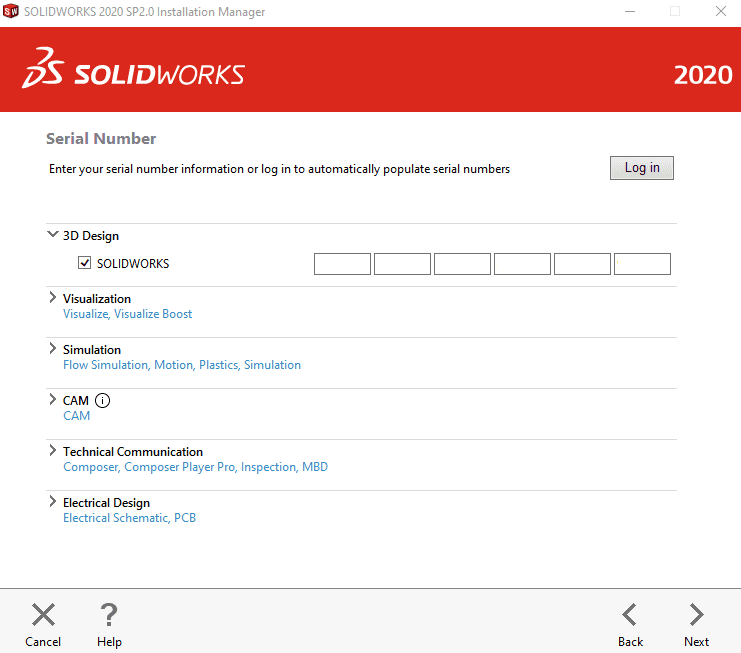
4. Enter your SOLIDWORKS CAD serial number and select Next.
5. Check the box next to the products that you would like to Install. Verify that SOLIDWORKS PDM client is checked at minimum. Select Next to proceed.
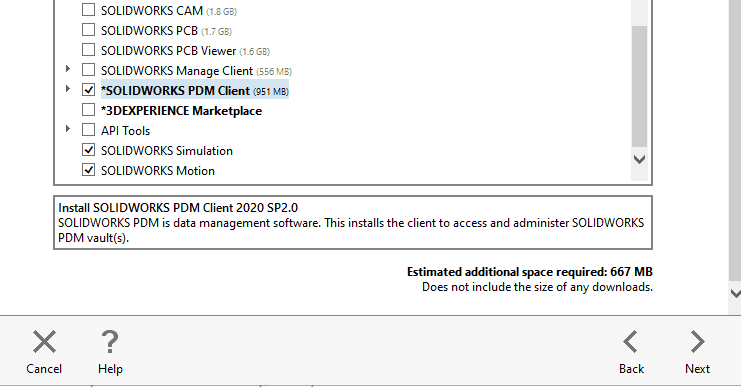
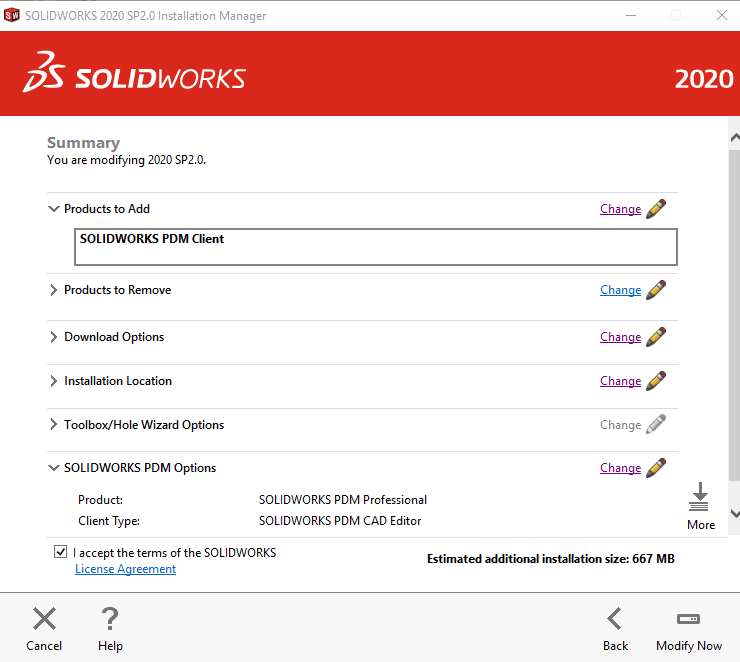
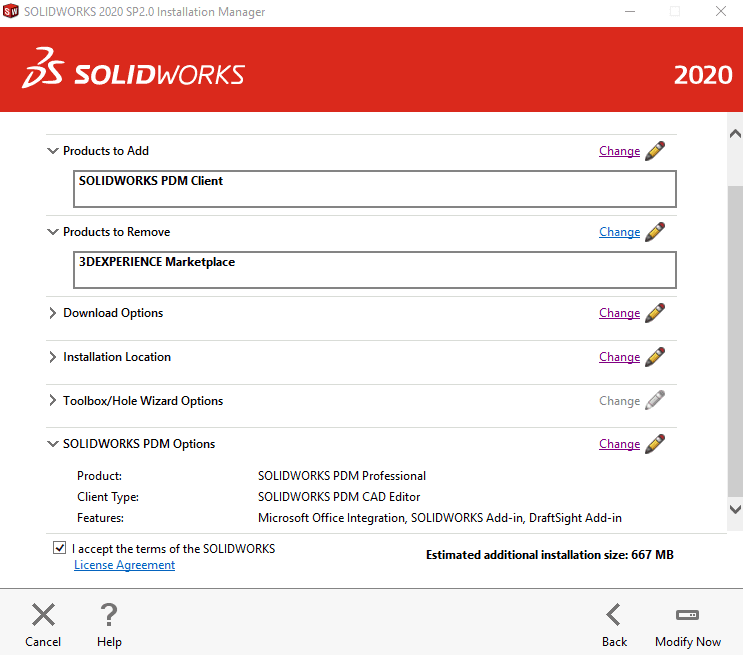
6. On the Summary page, scroll down to the SOLIDWORKS PDM options section. Select Change.
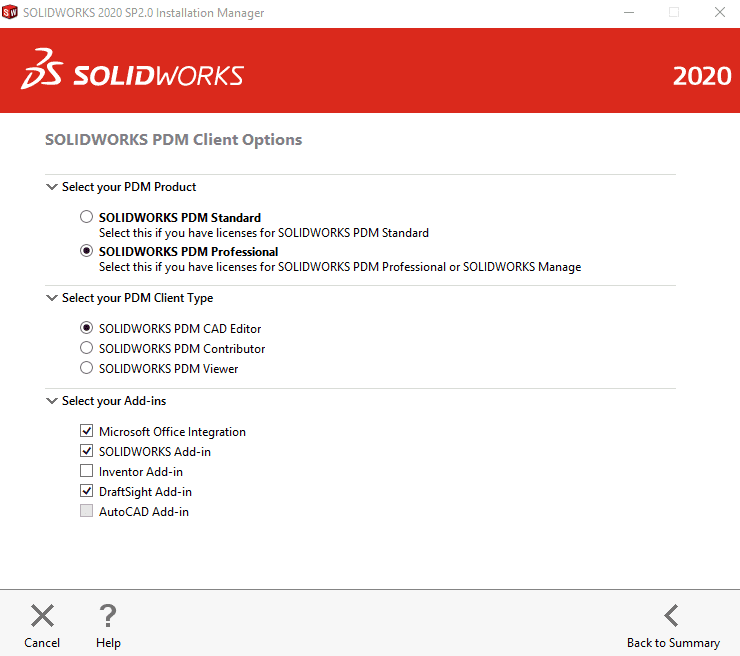
7. Verify or change the PDM Product. Select PDM Standard or Professional based on the vault type. Verify or change the PDM client type as well. Select Back to Summary.
8. Select Modify Now.
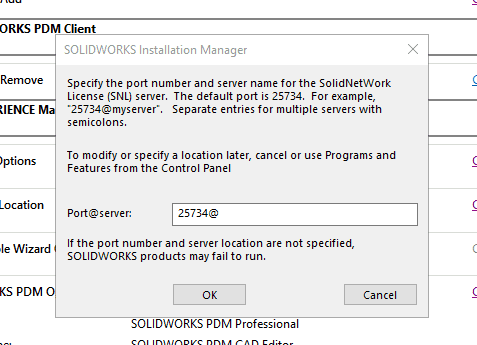
9. Enter the location of the PDM vault and/or server information where the license manager is activated. The information must be entered in the correct format.
25734@server name
Replace the text for server name with the correct server name. Select OK. (If you do not have connectivity at this time to the license server, you will get a warning that says it cannot reach the license server. Select Yes to proceed)
- This window may not pop up based on the license that was entered in the installation manager. That is not a problem. If this window does not pop up, proceed to Phase 3.
10. After the installation is completed, select Finish.
Phase 7 - WorkStation - Create PDM Local View
Creating a PDM Vault local view
Start at Step 1 when creating Vault View on end users workstation. For creating Vault View on PDM Server, Skip to Step 4
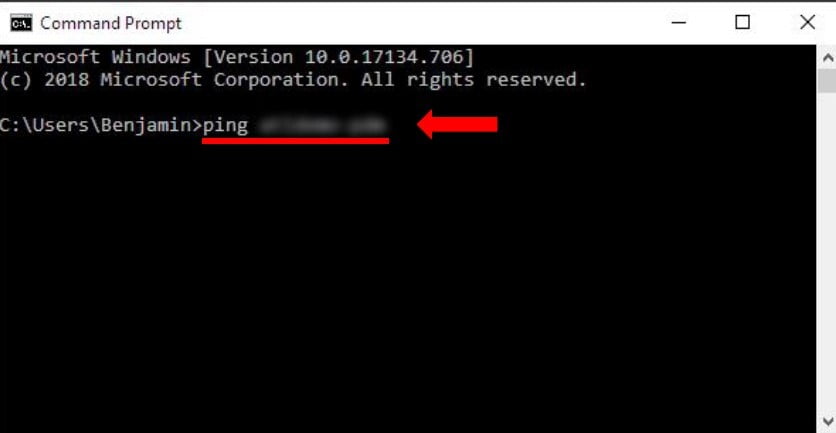
1. Test connectivity to the hosted server by conducting two ping tests in the command prompt. Launch the Command Prompt application in windows.

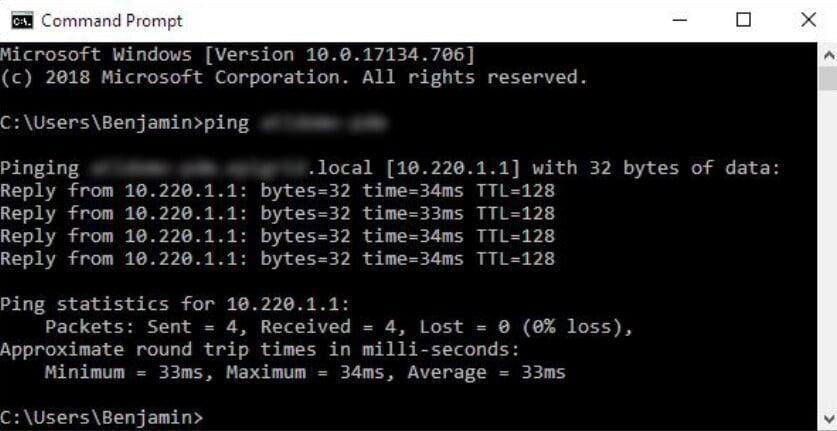
2. Enter the commands below to test connectivity to the server using the server name and the IP address. The server name and IP address can be found on the "Credentials and Installation Overview" document provided. ping servername ping IP address If the IP address replies successfully, but the server name ping does not respond, the Windows host file will need to be updated locally. Follow the steps in this document (Updating Host File for Windows 10) to add the IP address and server name to your local host file.
A successful Reply Indicates connectivity.
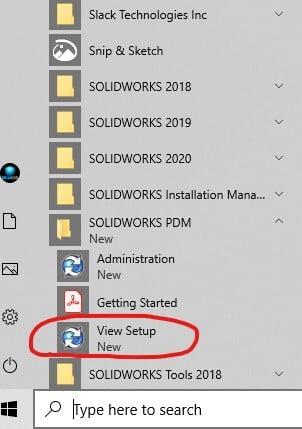
3. Navigate to the View Setup application in Windows. Start -> SOLIDWORKS PDM -> View Setup as shown below.
4. Select Next.

5. Select Add to add a new archive server to the list.
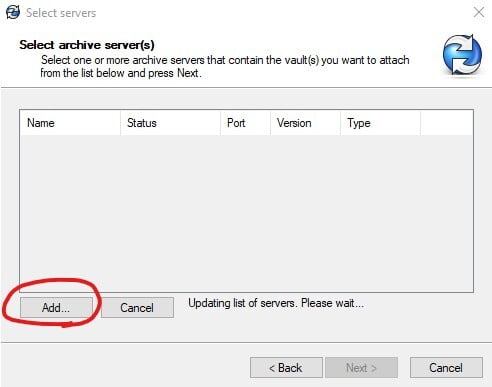
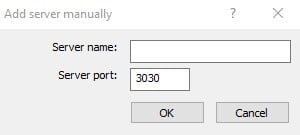
6. Enter the server name provided in the server name field. The server port should be 3030. Then select OK.
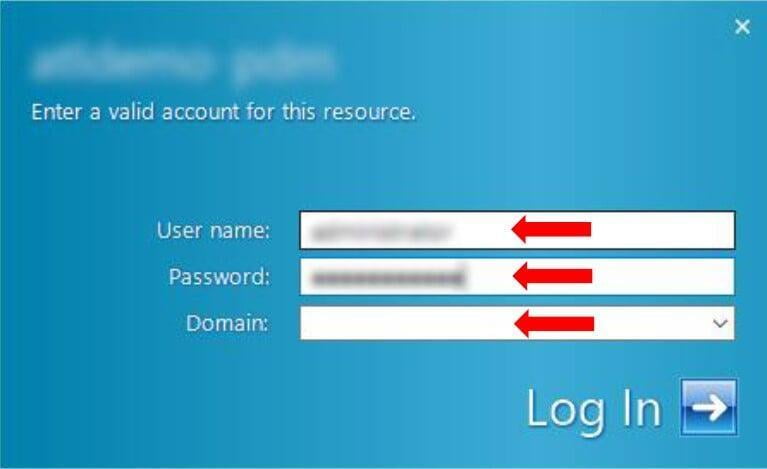
7. Enter the SERVER/VPN LOGIN CREDENTIALS (username and password) in the first two fields. This is NOT the PDM user login window. Important: Clear the text in the domain field or enter the server domain in the blank. Type the domain. The drop down will NOT display the correct domain.
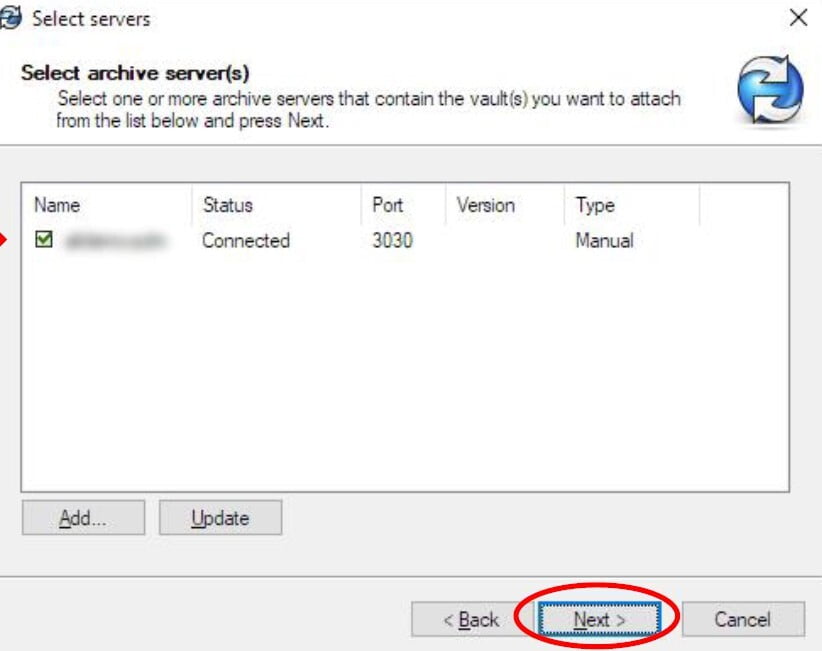
8. Once the server has been added, verify that the checkbox is selected and the Status is connected for the newly added server. Select Next.
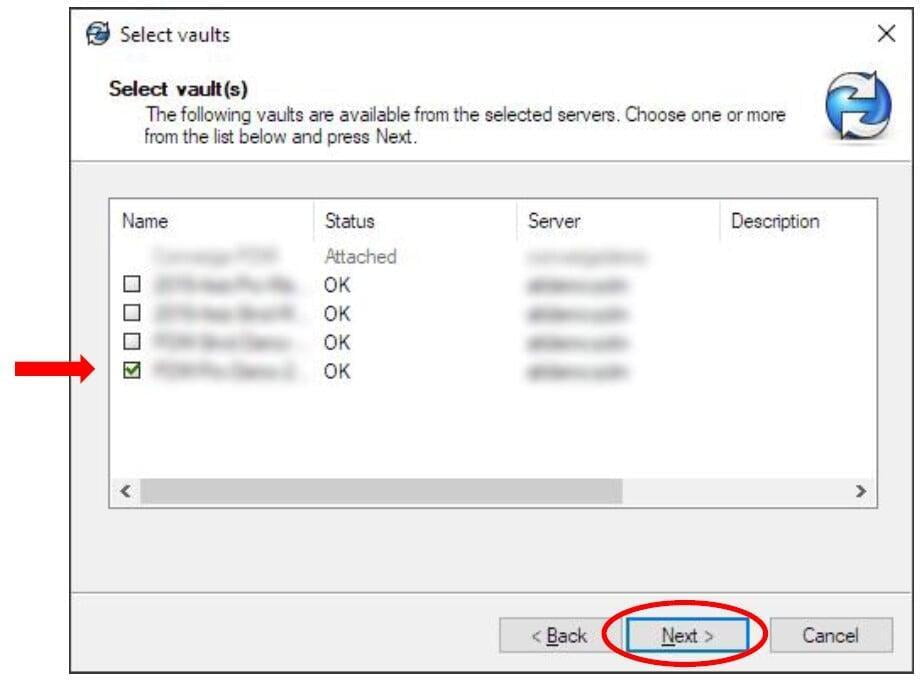
9. Select the checkbox for the vault which you would like to connect to. Select Next.
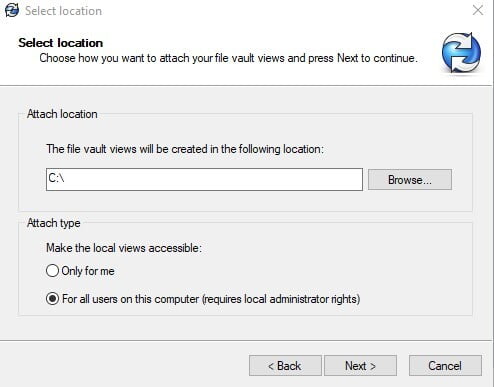
10. Select the C:\ drive for the vault Attach Location, then select Next.
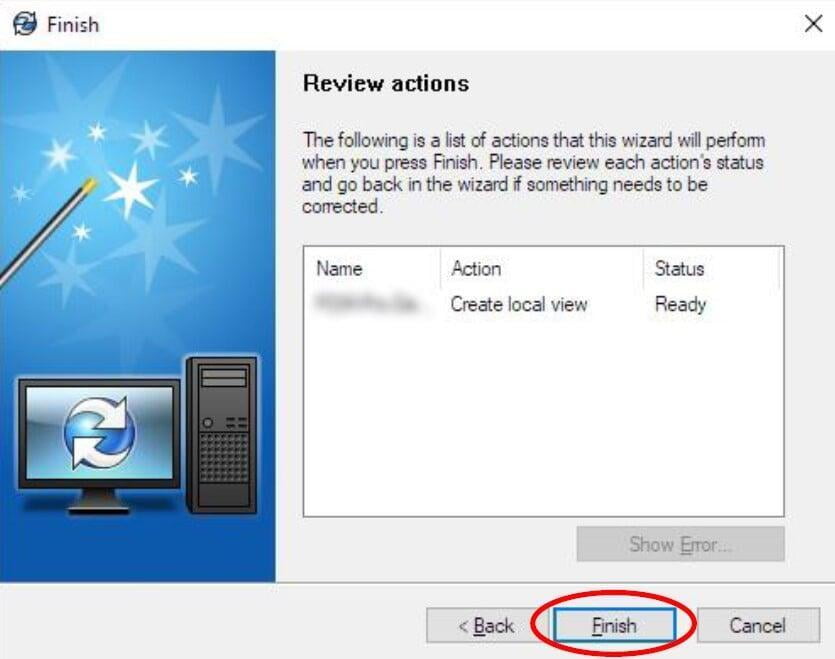
11. Review the actions and select Finish.
12. You may be prompted to login to the vault for the first time. If prompted, login to the PDM vault using PDM credentials. Select Close when the vault local view creation is completed.

13. Open Windows Explorer and navigate to the C drive, then select the PDM vault local view and verify that you can see Green Folders in the vault.